This manual contains comprehensive cleaning instructions for your Dyson V8. The different sections of this article represent the numerous V8 components that require cleaning.
I’ll go into detail here about cleaning Dyson V8 as the next step. I’ve purchased several Dyson vacuums in the past year and put them through a variety of cleaning tests.
Pros And Cons Of Dyson V8 Vacuum Cleaner
Pros:
- The Dyson V8 has up to 40 minutes of run time
- This vacuum does an excellent job of maneuvering around the home
Cons:
- The price of the V8 is a bit steep
- This Dyson does struggle with large debris on hardwood floors
Read More: Dyson Pet Hair Vacuum Review 2022
Tools You’ll Need
- Rubber gloves: a great way to avoid fingerprints on the vacuum. I have some OC smudges. Furthermore, it will keep your hands clean.
- Trash container: To dispose of the dustbin’s contents, get something with a big opening.
- Screwdriver set: In order to disassemble the Dyson V8 cyclone, you will require this. As some of the bolts are deep, get something with a magnetic head. Reattaching the fasteners won’t be challenging as a result.
How Do I Clean A Dyson V8 Filter?
The vacuum cleaner may perform poorly or emit an unpleasant odor if the filter is full or dirty. The cyclone needs to be thoroughly rinsed with cold water to remain clean. A washing machine or dishwasher should not be used to clean the filter. Before re-inserting it, you should dry it as well to avoid destroying its battery. (Read More: How to Change Dyson V8 Battery – Dyson Battery Replacement)
You should use a dish scrubber and cold water to clean the cyclone’s filter. Repeat this process until the filter is clear of all particles. The cyclone should then be dried by spending 24 hours in a warm environment. Never use a microwave or a tumble dryer to dry the cyclone. When cleaning the cyclone, make sure to always pay close attention to the directions.
Pull the vacuum cord out of the wall before removing the filter to access the cylcone. Remove the Dyson canister after you have taken the cyclone out. The filter can then be cleaned by tapping it against the sink’s side. Following that, you can clean the cyclone’s interior. To start, rotate it while holding it under the faucet to move the dirt.
The pre-filter needs to be cleaned after the cyclone is cleaned. Being that a filter is a separate unit, you must take extra care to prevent water from entering the pre-filter. The pre-filter should be rinsed with cold water after being rinsed. Spend a few minutes doing this. The filter needs to be dried after being cleaned, which you should do by putting it somewhere warm for a day. While rinsing it, you shouldn’t use a dryer or an open flame.
If your Dyson is pulsing, please check our guide: Why Is My Dyson Pulsing – How to Fix It
Pre- and post-filters are integrated into the Dyson v8 vacuum cleaner. Before reinstalling the pre-filter in the Dyson, it should be cleaned in cold water. After soaking it in cold water and squeezing the water out, clean the post-filter. Additionally, the post-filter needs to be rinsed, but you have to wait 24 hours before putting it back in the vacuum.
Turn the Dyson upside down and take out the pre-filter to clean the cyclone. The filter should then be run under a cold tap. After rinsing, you ought to squeeze out extra water and clean up the debris. You should run cold water over the post-filter to rinse it. Before reinstalling the filter in the Dyson, let the cyclone dry out.
The post-filter is easily cleaned by holding it under running water and loosening it with a counterclockwise twist. When it comes time to remove obstinate particles, use a dish scrubbie. It is recommended to let the post-filter air dry for 24 hours after cleaning it. To dry the filter, avoid using a dryer, microwave, or open flame. If you do this, your filter will become damaged, so you must thoroughly clean it before putting it back in the Dyson.
Usually, it is easiest to clean the pre-filter. Just take it off and give it a quick cold water rinse. To get rid of debris, rinse it under the faucet and squeeze the water out of it. You should reattach the post-filter, the last component of the filter, to your Dyson after washing. It will be possible to use the filter once it has been thoroughly rinsed. Consult the owner’s manual if you’re unsure of how to clean your filter.
The post-filter can be washed in cold water after the pre-filter has been cleaned. You can then reattach it to the Dyson once this is finished. You should give the vacuum cleaner’s filter another rinse under cold water after cleaning the post-filter. Then, take the filter out and put it back on the Dyson. Cleaning is necessary if something is dirty.
Regular cleaning is required for the filters in a Dyson v7 or v8, as they are prone to clogging over time. After the filters have reached capacity, you can rinse them under a cold faucet to get rid of the dust and debris. After that, you can put the machine back in the trash after it has had a chance to air dry. The vacuum must have a clean filter in order for it to operate properly, so this step is essential. The task of cleaning the filters is difficult, though.
Read More:
How Do You Clean a Dyson V8 HEPA Filter?
- Twist the filter counterclockwise to unlock and remove it.
- Rinse under running water to remove any accumulation of dirt.
- Shake well, then let it dry completely before reattaching.
Not as frequently as the pre-motor filter, the post-motor HEPA filter requires cleaning. Dirty particles can be successfully kept away from it with the help of Dyson cyclones.
When I checked Dyson, they didn’t specifically mention the interval. One online vacuum retailer, however, suggests cleaning it every three months.
Please be aware that both filters are what Dyson refers to as “lifetime,” which means that if you follow the recommended maintenance procedures, they will last the entire lifetime of the vacuum.
It’s time to replace the HEPA filter in your Dyson V8 once you’ve removed it. To accomplish this, turn the HEPA filter counterclockwise to remove it. Shake the post-filter thoroughly, then allow it to air dry. Then, reattach it to your Dyson. The filter will stay effective and new thanks to this step. The Dyson V8 vacuum cleaner can run for up to four hours in a few months.
Disassembling the post-filter and installing a new one will allow you to clean the Dyson V8. Turn the pre-filter counterclockwise to clear out any possible accumulated debris before removing it. The post-filter should then be rinsed with cold water after being wrung out. Once the post-filter has been taken out, thoroughly shake it with your hands and dry it.
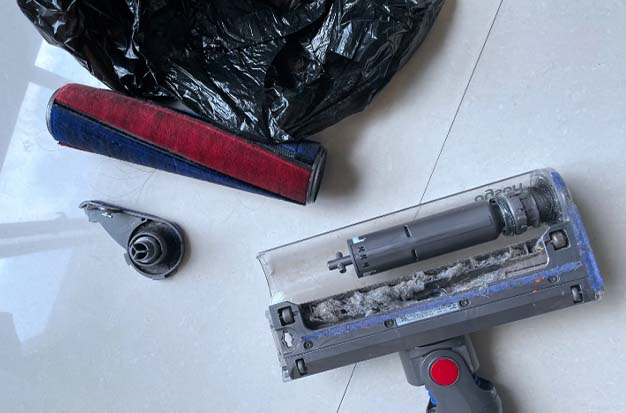
How Should A Dyson V8 Brush Head Be Cleaned?
The Fluffy attachment and the standard brush are the two different cleaning heads available for the V8.
You can watch me clean both if you want. Even though both nozzles can withstand tangles, it’s still important to regularly inspect and clean this component. Any accumulation of debris will increase friction and wear, which is bad for longevity.
Despite the fact that some Dyson nozzles have tangle-resistant features, it is still important to inspect and clean the brush head. Any accumulation of debris will increase wear and friction, which is bad for the system’s long-term performance.
Read More About More Dyson Vacuum:
- How to Clean Dyson DC40 Vacuum Cleaner
- Why Are Dyson Vacuums So Expensive
- How to Replace Dyson V6 Battery In Simple Ways
- How to Change Dyson V8 Battery – Dyson Battery Replacement
- How To Empty And Clean A Dyson Ball Vacuum
- How Long Is A Dyson Warranty
- How to Adjust Dyson Ball Vacuum for Thick Carpet?
- How Long Does a Dyson Vacuum Last?
- Dyson V15 Detect Pet Hair Vacuum Review 2022
- Dyson Pet Hair Vacuum Review 2022
- How to Empty a Dyson Vacuum Cleaner-Different Types
- How to Clean A Dyson Vacuum-10 Easy Ways
How To Clean A Dyson V8 Cyclone
Before you do anything, keep in mind that doing so might void the warranty. We are now ready to clean the cyclone. So, if you are Dyson is still under warranty, I would NOT advise you to open your cyclone.
One more thing: only attempt this if you are certain that you can put it back together. That implies that you are an electronic person or have experience with do-it-yourself projects.
I advise taking pictures of each step of the V8 cyclone disassembly process before you begin, so you will have a reference when you put it back together.
- Remove the pre-motor filter.
- Empty the dustbin. The red lever should be pulled to empty the contents, then pushed to release the dust container’s outer shell. You can put something dirty aside for the time being and clean it later. (Read More: How to Empty a Dyson Vacuum Cleaner-Different Types)
- Remove the cyclone assembly. Locate the red lever and push it after removing the dust bin’s outer shell. After that, raise the entire assembly. Use a torque screwdriver to remove the four Torx screws that you will see. Once the screws are out, remove the component and put it in a ziplock bag or a secure location.
- The screen filter must be released. To gently pull the filter upward while rotating it, use a flat object like a flat screwdriver. As you pull, you’ll feel the clips become less tight. Pull out the mesh filter and clean it with a fresh microfiber towel after you’ve unfastened all the clips. Alternatively, you could thoroughly wash it with water and then dry it.
- Remove cyclones. You’ll have access to the Torx screws holding the outer cyclone shell as soon as you take out the mesh filter. After removing the four screws, pull the cover to reveal how filthy it is. The inner part can then be taken out because it isn’t held in place by any screws.
- The top cyclone assembly should be taken apart. There are two outside and four internal Torx screws on the cyclones. To locate the inner screws, you might need some assistance from a flashlight. Disassemble it once all the screws have been located and taken out. To prevent losing them, place every screw in the ziplock bag.
- The cyclone part should be cleaned. With running water, clean every component. To get rid of tenacious dirt, use an old toothbrush. Don’t scrub too vigorously because doing so could harm the component. After washing, let it dry completely before placing it back.
How Often Should You Clean Your Vacuum
The frequency of cleaning each component of your vacuum may vary. So, we created a small table to serve as your guide.
- Parts: Cleaning Schedule
- Brushes and Bristles: After every use
- Dust canister/Dust cup: After every few uses
- Filters: Once a month
- Deep cleaning: Once a year
You might also need to completely replace your vacuum once every ten years.
Read More: How Long Does a Dyson Vacuum Last?
Summary
The Dyson V8 is a cordless vacuum that can run for up to 40 minutes, has a number of power settings, and a selection of cleaning attachments, and can be used as a stick vacuum or a handheld vacuum. Any user could make a good choice with this Dyson vacuum because it can work well on all indoor surfaces. Price is the only drawback, which is outrageous. If owning a Dyson V8 vacuum appeals to you, make sure money is not a concern.
With our detailed instructions, cleaning your Dyson V8 should go quickly. Cleaning the parts frequently will keep your vacuum running at its best.
